You’ve got the dress sorted, now it’s time to think about wedding beauty. Here are some “do’s & don’t” when it comes to bridal make-up to make sure you look flawless on your big day.
And don’t forget the team at the Waterfront are here to help every step of the way. We can even recommend some great make-up artists like Artistry Co to get you started.
Do:
- Make sure you have your trial at least three weeks, but no more than 5 weeks, before your wedding. If you plan on using fake tan for the big day, have a test run before your make-up trial so that your artist can see what colour your skin becomes with the tan.
- Wear a white t-shirt if you’re having your make-up test in a store so that you can see how the make-up looks against a pale colour and take a picture of yourself in day light (with no flash) to see how it looks before you purchase anything.
- Emphasize your eyes by brightening any darkness under them with corrector and concealer
- Bring references to your make-up trial. Start looking for images of make-up that you really like and bring them with you on the day. Try to identify what it is you like about the make-up in the image and take into account that if you have the skin colour of Dita Von Teese then the make-up of Kim Kardashian won’t necessarily work well for you.
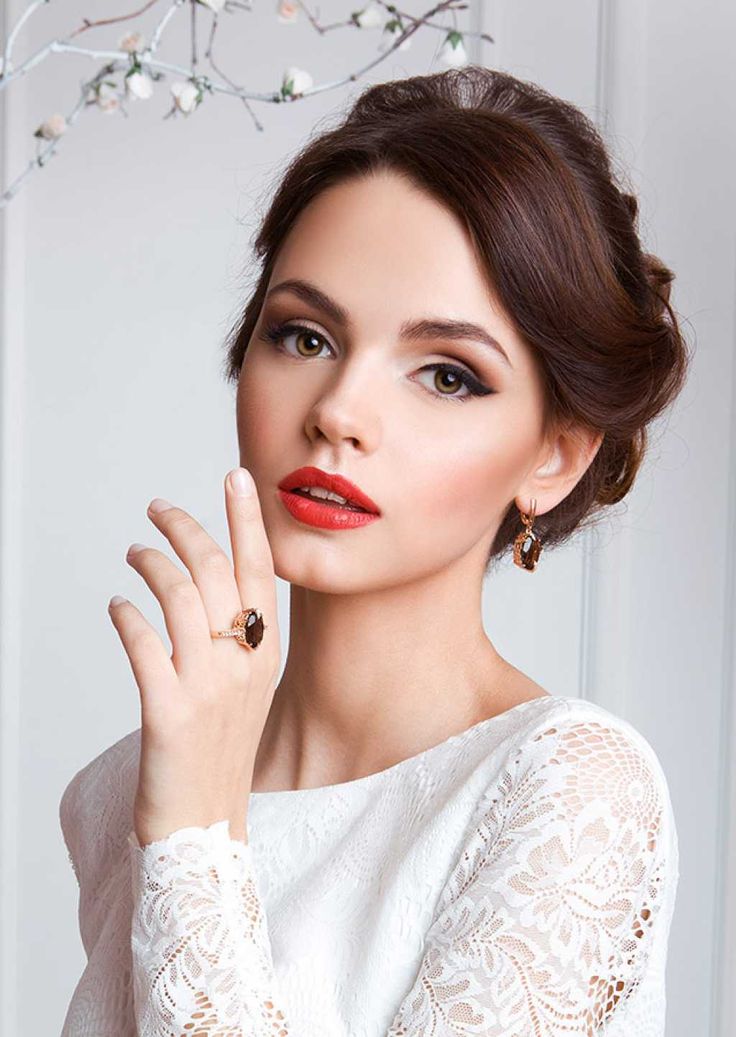
- Remember that bridal make-up needs to have enough colour to compensate for the whiteness of the dress. There’s a big difference between everyday clothes and a wedding dress, so there should be difference in your make-up, too. Start by making sure your skin looks even and smooth, and then add colour to your cheeks and lips to give them a glow.
- Use individual eyelashes – they’re a brilliant way to make your eyes stand out and look far more subtle than a full strip. Go for differing lengths to create a really natural fluttery look and nestle them in between your natural lashes rather than fixing them on top.
- Focus on the most important elements of your look, such as beautifully natural-looking skin, softly groomed brows and feathery lashes. If you get these basic factors right the rest of your make-up will fall into place.
Don’t:
- Have your make-up test done anywhere with overhead fluorescent lighting. If you have a professional make-up artist coming to your home, arrange a time when it’s still daylight outside.
- Trowel it on. It’s a total myth that your make-up has to be plastered on for the photographs. Lots of wedding photography is done in natural light, and if you choose a heavy base the make-up will look obvious. In terms of flash, you just need to ensure that your T Zone is matte and that can be achieved with fine translucent powders and blotting powders, not layers of make-up.
- Go for anything too trend-led. It’s worth bearing in mind that you’ll have to live with photos from your wedding for the rest of your life, so it’s best to avoid statement looks and opt for something more classic; that glittery eyeliner you saw on a Parisian catwalk might look super pretty and modern now, but chances are it’ll look tired and dated in twenty years’ time. This isn’t to say that you’ll have to make yourself up in a symphony of beiges though if you’re used to a more punchy make-up – vintage wedding dresses in particular can look breathtaking with a classic old Hollywood lipstick colour.
- Be scared of going a bit brighter. Neutral, brown, and pale lip colours can look washed out in photographs, so choose a lipstick that’s one or two shades brighter than what you would normally wear. If you usually wear a neutral hue, it should be worn as a base, with a pink or rose colour on top. If you typically wear dark lipstick, use that as the base, and apply a brighter pink on top to give the colour a lift. Pinks, roses and plums are all great, classic choices for brides.
- Just apply make-up to your face. Instead, extend down your neck and over your shoulders if necessary, this will ensure you face is not a different colour or even texture to your body. Everything should look uniform to create the most natural look possible. An easy way to blend uneven skin tones together is to use a light fake tan. Do this the day before your wedding not the night and beware of darkening your skin tone too much as the effect can actually the deaden the look of your complexion
- Forget to decide what kind of maintenance you’d prefer for the day. For example, are you happy to check you’re looking okay throughout the day, or do you want to just forget about your make-up once it’s on? Waterproof mascara is an obvious requisite, but it’s also worth considering cream eyeshadows that really set – you can be sure they’ll stay where you put them.
- Go too dark on the eyes. Define your eyes by applying colour in the crease, but avoid using a shade that’s too dense, as it can detract from the eyes themselves.
- Go too glossy or too matte. It’s best to avoid lipsticks at either end of the texture scale; too glossy and they’ll only last five minutes whilst too matte and they may leave your lips dry and cakey by the time it’s the moment to kiss your groom. A moisturising, satin-y finish lipstick is best for a wedding – this kind of formula will keep your lips looking their best and will wear off the most evenly and naturally; several thin layers, blotted between applications will give the most long-lasting finish.
- Rush. Allow at least 45 minutes to an hour for make-up application on the wedding day.
Sources: Marie Claire, Sophora & The Knot